 how-to
How to Wash a Car Without Scratching Paint
Table of Contents
- Why Scratch Prevention Matters for Your Paint
- Prepare Your Car and Washing Area
- Pre-Rinse Your Car to Remove Loose Dirt
- Master the Two Bucket Method for Car Washing
- Choose the Best Car Wash Mitt for Scratch Prevention
- Execute the Wash: Top-Down Technique with Light Pressure
- How to Dry a Car Without Scratching
- Touchless Car Wash Benefits vs. Hand Washing
- Frequently Asked Questions
Last Updated: October 7, 2026
Why Scratch Prevention Matters for Your Paint
Your car's paint shields the metal underneath from rust, weather, and damage.
Most paint damage happens during washing, not driving. At Koala Wash, we've spent over 13 years in the in-bay automatic car wash industry.
Micro-scratches are tiny lines invisible from a distance but visible under light.
If your car has a ceramic coating or new paint, proper washing keeps these investments looking new and functioning as intended.
Prepare Your Car and Washing Area
Wash in shade if possible. Direct sunlight dries soap too fast, leaving streaks and water spots. A driveway, parking lot, or covered area all work.
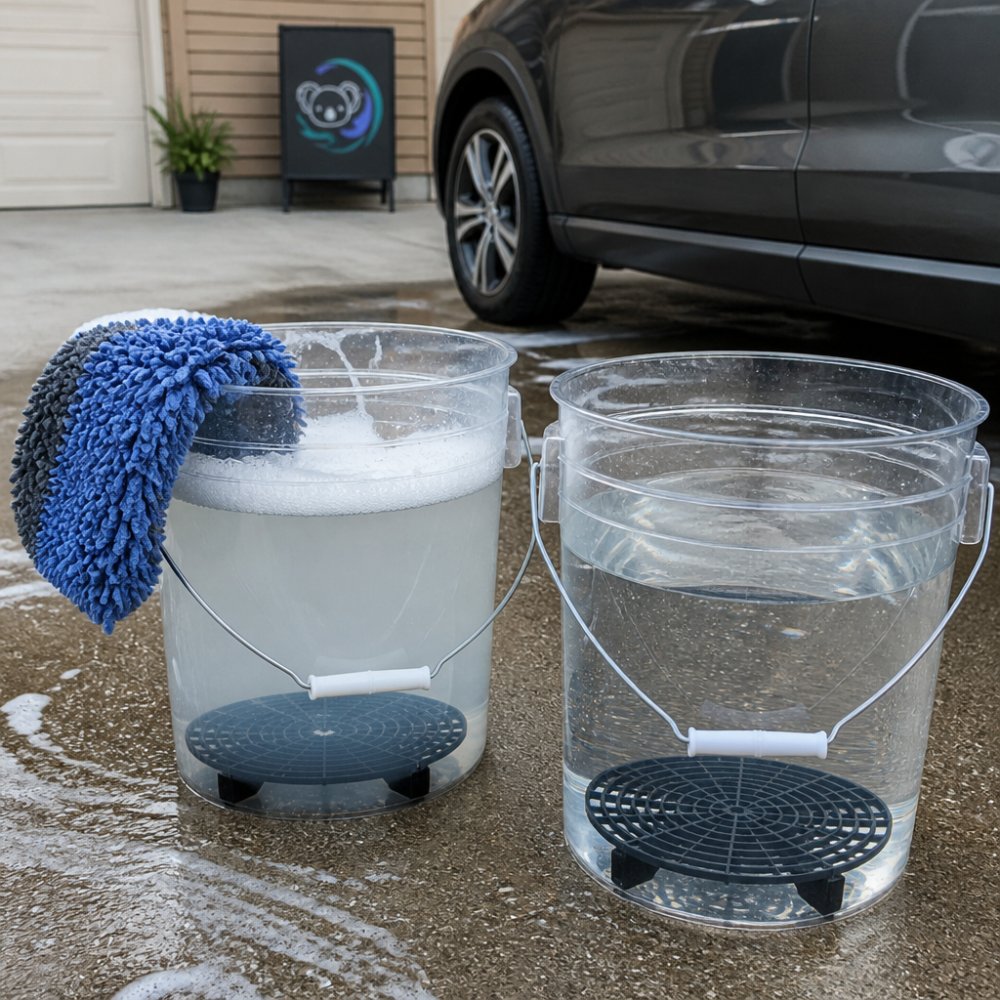
Gather your supplies before you start:
- Two buckets (5-gallon minimum)
- Grit guards for both buckets
- Microfiber wash mitt
Rinse your wash area first to remove loose debris that could get into your water or onto your car.
Check your car's condition. If your paint already has scratches or swirl marks, adjust your pressure and technique accordingly.
Pre-Rinse Your Car to Remove Loose Dirt
This step separates scratch-free washes from damaged ones. Loose dirt is abrasive, dragging a wet mitt over dirty paint is like dragging sandpaper across it.
Use a garden hose with a wide spray pattern, starting at the top and working down, to remove loose dirt and grit before your wash mitt touches the paint. Use moderate pressure, not maximum: a 40-degree nozzle or wider is safer than a narrow stream, and avoid pointing it at seams, trim, or areas where water could get trapped.
Master the Two Bucket Method for Car Washing
The two-bucket method is the foundation of scratch-free washing: one bucket holds soapy water, the other clean rinse water, so dirt never builds up in your wash solution.
Here's how it works:
- Fill both buckets with water
- Add car-wash soap to one bucket only (follow product instructions for amount)
- Dip your wash mitt into the soapy water
- Wash a small section of the car
- Rinse the mitt in the clean water bucket
- Wring out the mitt
- Repeat
The clean water bucket removes dirt from your mitt between sections, and grit guards at the bottom of each bucket trap dirt so it isn't picked up again.
Wash one panel at a time, a door, fender, or hood, so you rinse the mitt frequently and keep your wash water clean.
Choose the Best Car Wash Mitt for Scratch Prevention
Your wash mitt is the only tool that touches every painted panel, so it deserves the most scrutiny. The wrong mitt grinds trapped grit across the clear coat with every stroke.
Why microfiber works
Microfiber splits each fiber into wedge-shaped strands thinner than a human hair, lifting and holding dirt inside the pile rather than pressing it against the paint. A sponge or cotton towel traps grit at the contact point and drags it, that geometry, not brand or price, separates a scratch-free wash from a swirl-marked one. Maintaining this level of surface integrity remains the most effective way to prevent paint chips that often occur when debris is ground into the clear coat during routine maintenance.
Join our Koala Club for a FREE wash →
Selection criteria for a wash mitt
- Construction: Twist-loop or chenille microfiber; the open loops pull grit away from the surface. Flat-weave is fine for drying but too thin for washing.
- GSM: 300 to 500 is the practical range. Below 300 the pile is too short to hold grit; above 500 the mitt is heavy and hard to rinse.
- Cuff and seams: A sewn cuff or elastic band with no exposed stitching on the wash face, loose threads and hard seams scratch.
What to avoid
- Natural sponges: Hold grit at the surface and can't release it in a rinse bucket.
- Sheepskin and wool: Soft when new, but fibers mat down and trap sand over time.
- Stiff brushes: Fine for tires and wheel wells, never for paint.
Matching the rest of your kit to the same standard
A good mitt is wasted if the surrounding tools aren't chosen with the same logic.
- Drying towels: 400 to 600 GSM plush microfiber with a silk-banded edge. One 16 x 24 inch towel absorbs about a quart, so two cover a mid-size sedan.
- Buckets: Five gallons is the working minimum; a molded lip and snug grit guard matter more than extra size.
- Grit guards: Should sit flush at the bottom with a raised grid. If it floats or tilts, it isn't trapping anything.
Care and replacement
Rinse your mitt in the clean-water bucket after every panel, then wash it alone on a warm cycle with no fabric softener (which coats fibers and destroys their ability to lift dirt) and air-dry it. Replace it when the pile feels matted, it stops holding suds, or grit stays embedded despite rinsing, typically every 12 to 24 months with regular use.
If you're washing a ceramic-coated vehicle, microfiber is non-negotiable, the coating protects paint, but not against scratches from poor washing technique.
Execute the Wash: Top-Down Technique with Light Pressure
With your area prepped, rinse done, and tools chosen, learning how to wash a car without scratching paint comes down to sequence and pressure. Get those right and the rest is repetition.
The panel-by-panel sequence
Work in this order, rinsing the mitt in the clean-water bucket between every panel:
- Roof, the highest point, so any drips fall onto panels you haven't touched yet.
- Hood and trunk lid, large, flat, and easy to read for missed spots.
- Upper sides, windows, pillars, and the top half of doors and fenders.
- Lower sides, rocker panels and the bottom of doors, where road film concentrates.
- Front and rear bumpers, bug splatter and exhaust film live here.
- Wheels and tires last, always with a separate mitt or brush, never the one you used on paint.
Why this order works: gravity carries soap and rinse water downward, so you never drag dirty runoff across a cleaned panel, and the dirtiest areas, lower body and wheels, are handled last.
Pressure and motion
Let the soap do the work. Guide the mitt, don't press it, if you can see it compressing against the paint, you're pushing too hard. Use straight strokes that follow the length of the panel; circular motions are the classic cause of swirl marks because they repeat the same arc. On curved sections, follow the contour. Rinse the mitt every two to three feet of travel, roughly a dozen rinses per side on a full-size SUV, and you'll see how much grit comes off in the rinse bucket after the first panel.
What to do if you find scratches mid-wash
Stop and assess before continuing. Not every mark is a scratch, and not every scratch needs a polisher.
- Water spots and smears: Mineral or soap residue, not damage. They wipe off with a quick detailer and clean microfiber towel.
- Swirl marks (fine circular lines under direct light): Usually clear-coat marring from prior washes. A hand or light machine polish can reduce them, but they return if the wash technique doesn't change.
- Isolated straight scratches: Check with a fingernail. If your nail catches, it's through the clear coat and needs professional attention; if it glides over, polish may remove it.
After a first careful wash, you may discover swirl marks that were already there, hidden under dirt. That's damage you revealed, not caused, use it as a baseline and track whether new marks appear after later washes.
When to stop and get help
If new marring appears after every wash despite following the sequence, the cause is usually contaminated wash water, a worn mitt, or too much pressure. Replace the mitt, refresh the buckets, and slow down. If scratches persist, professional paint correction, a machine polish that removes a thin layer of clear coat, can reset the surface, but clear coat can only be polished a limited number of times.
Timing
A careful two-bucket wash on a mid-size sedan takes 20 to 30 minutes for the paint, plus 10 to 15 minutes for wheels and drying. Rushing is the most common reason technique breaks down, budget the time and the sequence will hold.
How to Dry a Car Without Scratching
Drying is where many people undo their careful washing. Wet paint is vulnerable.
Here's the right way to dry:
Use a leaf blower or compressed air first. Start at the top and work down with moderate pressure to remove standing water without contact, this alone prevents 80% of water spots.
Work in sections. Dry the roof, then hood, then sides, then wheels, so you don't miss spots.
Wring out your towel frequently. A saturated towel stops absorbing and starts dragging water around; keep it damp, not dripping.
Join our Koala Club for a FREE wash →
Never use chamois or fake chamois. They leave streaks and catch on details.
Proper drying takes 10-15 minutes but protects your paint investment.
Touchless Car Wash Benefits vs. Hand Washing
Hand washing gives you control, but it requires time, skill, and equipment, not always practical for busy professionals or multiple vehicles.
Touchless car wash systems use high-pressure water jets and specialized cleaning solutions to remove dirt without brushes or contact. They're fast, consistent, and eliminate human error.
Touchless car wash advantages:
- No risk of scratches from improper technique
- 5-10 minute wash cycle
- Works well for routine maintenance cleaning
Hand washing advantages:
- More thorough for heavily soiled vehicles
- Better for detailed cleaning around trim
- Allows you to inspect paint condition closely
Keeping your car's paint pristine doesn't require expensive treatments or special skills, just the right technique, tools, and patience.
Touchless Car Wash makes scratch-free cleaning simple. Join our Koala Club for a free wash and discover how convenient maintenance cleaning can be, with flexible wash passes and 24-hour access, keeping your vehicle pristine fits your schedule.
EPA guidelines on vehicle washing and water conservation
Ceramic coating care and maintenance best practices
Paint protection and scratch prevention standards
Frequently Asked Questions
What's the safest way to wash a car to avoid scratches?
Use the two-bucket method with a microfiber wash mitt, pre-rinse to remove loose dirt first, and wash from top to bottom with light pressure. Rinse your mitt frequently in the clean rinse bucket to remove grit before returning to the soapy water. Avoid dragging the mitt across the paint and use a drying towel that won't create friction. This approach minimizes micro-scratches and swirl marks that accumulate over time.
Are touchless car washes better for preventing paint scratches?
Touchless car wash benefits include zero brush or mitt contact, eliminating the friction that causes scratches and swirl marks. These systems use high-pressure water and cleaning solutions instead. Touchless washes are especially valuable for ceramic-coated or newer vehicles where paint protection is a priority. However, proper hand-washing with correct technique also prevents scratches effectively when done carefully.
What should I avoid using when washing my car?
Avoid dish soap like Dawn, which strips protective coatings and wax. Don't use regular towels, sponges, or chamois cloths, these trap grit and cause scratches. Skip high-pressure washers on paint, and never use circular motions or excessive pressure with any tool. Avoid washing in direct sunlight, which causes water spots and soap residue to set before you can rinse. Don't reuse dirty wash water or skip the rinse step between mitt dips.
How do I prevent swirl marks when washing my car?
Swirl marks result from friction and trapped grit. Prevent them by pre-rinsing thoroughly to remove loose dirt, using the two-bucket method to rinse your mitt frequently, and applying light pressure with microfiber tools. Wash from top to bottom so dirty water drains away. Use a grit guard in your rinse bucket to settle particles at the bottom. When drying, dab and lift rather than dragging the towel across the paint. These steps dramatically reduce swirl marks and micro-scratches.